MQL4でボタンを作成していましたが、よりトレードに使えるパネルを CAppDialog と CLabel を使って作成してみたいと思います
CAppDialog
トレードパネルを作成する上で、ベタでオブジェクトを組み合わせて作成するよりも、
MQL5でのクラスを利用したほうが後々便利だと思います
|
CLabel |
「Text label」 グラフィックオブジェクトに基づいたコントロール |
|
CBmpButton |
「Bitmap Label(ビットマップラベル)」グラフィックオブジェクトに基づいたコントロール |
|
CButton |
「Button」グラフィックオブジェクトに基づいたコントロール |
|
CEdit |
「Edit field」グラフィックオブジェクトに基づいたコントロール |
|
CPanel |
「Rectangle label」グラフィックオブジェクトに基づいたコントロール |
|
CPicture |
「Bitmap Label(ビットマップラベル)」グラフィックオブジェクトに基づいたコントロール |
以下のMQL5の記事を参考にやってみます


ただMQL4ではうまく機能しない部分もあります
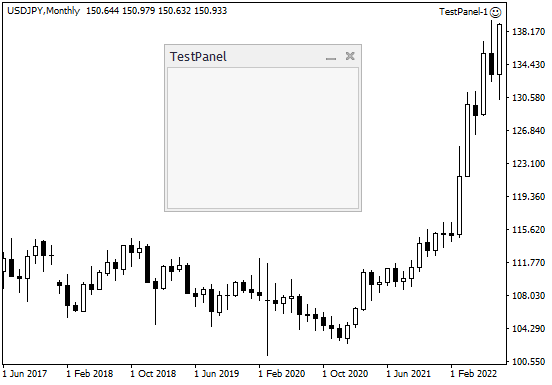
パネルをCAppDialogで作成
最初に基本的なダイアログを作ります
大まかな流れとして
- Dialog.mqhのインクルード
- ..\MQL4\Include\Controls\Dialog.mqh ヘッダーファイルのインクルードします
- ..\MQL4\Include\Controls\Dialog.mqh ヘッダーファイルのインクルードします
- カスタムクラスを定義
- CAppDialogを継承したユーザーが決めたクラス、 CTestPanel クラスを定義してCreate
- CAppDialogを継承したユーザーが決めたクラス、 CTestPanel クラスを定義してCreate
- オブジェクトの作成
- CTestPanel からオブジェクト(インスタンス)であるTPanelを作成
OnInit() でCreateして実行、Run()
- CTestPanel からオブジェクト(インスタンス)であるTPanelを作成
TestPanel-1.mq4
|
1 2 3 4 5 6 7 8 9 10 11 12 13 14 15 16 17 18 19 20 21 22 23 24 25 26 27 28 29 30 31 32 33 34 |
#include <Controls\Dialog.mqh> class CTestPanel : public CAppDialog{ private: public: CTestPanel(void){}; ~CTestPanel(void){}; protected: }; CTestPanel TPanel; int OnInit(){ if(!TPanel.Create( ChartID(), // chart ID "TestPanel", // name 0, // subwindow 160, // x1 40, // y1 360, // x2 210 // y2 )){ return (INIT_FAILED); } TPanel.Run(); return(INIT_SUCCEEDED); } void OnDeinit(const int reason){ TPanel.Destroy(reason); } |
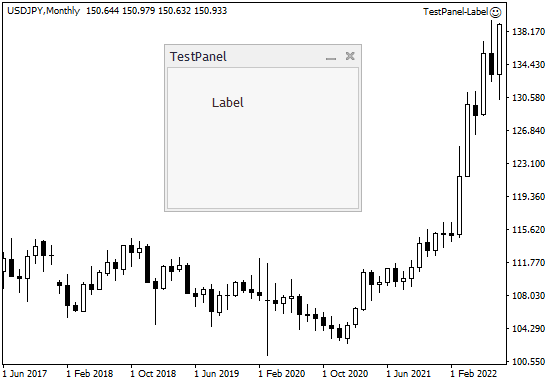
シンプルなパネルをチャートに表示できました
CLabl を載せる
次はこのPanelにLabelを載せてみます
- Label.mqhのインクルード
- ..\MQL4\Include\Controls\Label.mqh ヘッダーファイルのインクルードします
- ..\MQL4\Include\Controls\Label.mqh ヘッダーファイルのインクルードします
- カスタムクラスを定義
- CAppDialogを継承したユーザーが決めたクラス、 CTestPanel クラスにCLabelを追加
- CreateLabel() を定義
- オブジェクトの作成
- CTestPanel からオブジェクト(インスタンス)であるTPanelを作成
- CreateLabelで位置、テキストなどを作成
OnInit() でオブジェクトをCreateして実行、Run()
TestPanel-Label.mq4
|
1 2 3 4 5 6 7 8 9 10 11 12 13 14 15 16 17 18 19 20 21 22 23 24 25 26 27 28 29 30 31 32 33 34 35 36 37 38 39 40 41 42 43 44 45 46 47 48 49 50 51 52 53 54 55 56 57 58 59 60 61 62 63 64 65 66 67 68 69 70 71 72 73 74 |
#include <Controls\Dialog.mqh> #include <Controls\Label.mqh> class CTestPanel : public CAppDialog{ private: CLabel testLabel; public: CTestPanel(void){}; ~CTestPanel(void){}; virtual bool Create(const long chart,const string name,const int subwin,const int x1,const int y1,const int x2,const int y2); protected: bool CreateLabel(void); }; bool CTestPanel::Create(const long chart,const string name,const int subwin,const int x1,const int y1,const int x2,const int y2){ if(!CAppDialog::Create(chart, name, subwin, x1, y1, x2, y2)){ return(false); } if(!CreateLabel()) return(false); return(true); } bool CTestPanel::CreateLabel(void){ if(!testLabel.Create(m_chart_id, "Label", m_subwin, 45, 26, 145, 46)) return(false); if(!testLabel.Text("Label")) return(false); if(!Add(testLabel)) return(false); return(true); } CTestPanel TestPanel; int OnInit(){ if(!TestPanel.Create( ChartID(), // chart ID "TestPanel", // name 0, // subwindow 160, // x1 40, // y1 360, // x2 210 // y2 )){ return (INIT_FAILED); } TestPanel.Run(); return(INIT_SUCCEEDED); } void OnDeinit(const int reason){ TestPanel.Destroy(reason); } void OnChartEvent(const int id, const long &lparam, const double &dparam, const string &sparam){ TestPanel.ChartEvent(id, lparam, dparam, sparam); } |
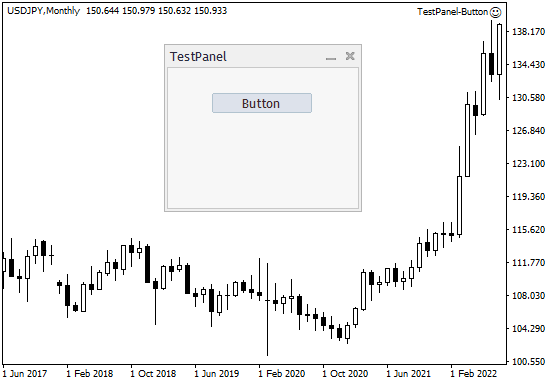
CAppDialogに CButton を配置
CButtonをCAppDialogに乗せてみたいと思います
容量としてはCLabelと同様です
クリック動作はMQL5ではEVENT_MAPを使うと細かく操作できますが
MQL4ではうまくいかないところもあり OnChartEvent() を使います
TestPanel-Button.mq4
|
1 2 3 4 5 6 7 8 9 10 11 12 13 14 15 16 17 18 19 20 21 22 23 24 25 26 27 28 29 30 31 32 33 34 35 36 37 38 39 40 41 42 43 44 45 46 47 48 49 50 51 52 53 54 55 56 57 58 59 60 61 62 63 64 65 66 67 68 69 |
#include <Controls\Dialog.mqh> #include <Controls\Button.mqh> class CTestPanel : public CAppDialog{ private: CButton testButton; public: CTestPanel(void){}; ~CTestPanel(void){}; virtual bool Create(const long chart,const string name,const int subwin,const int x1,const int y1,const int x2,const int y2); protected: bool CreateButton(void); void OnClickButton(void); }; bool CTestPanel::Create(const long chart,const string name,const int subwin,const int x1,const int y1,const int x2,const int y2){ if(!CAppDialog::Create(chart, name, subwin, x1, y1, x2, y2)) return(false); if(!CreateButton()) return(false); return(true); } bool CTestPanel::CreateButton(void){ if(!testButton.Create(m_chart_id, "Button01", m_subwin, 45, 26, 145, 46)) return(false); if(!testButton.Text("Button")) return(false); if(!Add(testButton)) return(false); return(true); } CTestPanel TPanel; int OnInit(){ if(!TPanel.Create( ChartID(), // chart ID "TestPanel", // name 0, // subwindow 160, // x1 40, // y1 360, // x2 210 // y2 )){ return(INIT_FAILED); } TPanel.Run(); return(INIT_SUCCEEDED); } void OnDeinit(const int reason){ TPanel.Destroy(reason); } void OnChartEvent(const int id, const long& lparam, const double& dparam, const string& sparam ){ TPanel.ChartEvent(id, lparam, dparam, sparam); if(id == CHARTEVENT_OBJECT_CLICK){ if(sparam == "Button01"){ Print("Clicked"); } } } |
ボタンを載せたパネルができました
MQL4はC言語ベースで、MQL5はC++のオブジェクト指向でのプログラミングになります
MQL4のbuild 600 あたりから改変され、MQL5の一部を取り込んだ仕様になり
それまでのMQL4がコードが使えなくなったことがありました
MetaとしてはMQL5に移行したいのでしょうけれど、MQL4で作られたインジケータやEAを
求めるユーザーが多く、MQL4はMQL5の一部機能も使える中途半端な状態となっています