ユーザーの選択を、ラジオボタン CRadioButton と CRadioGroup を使って取得する方法をサンプルコード付きで紹介します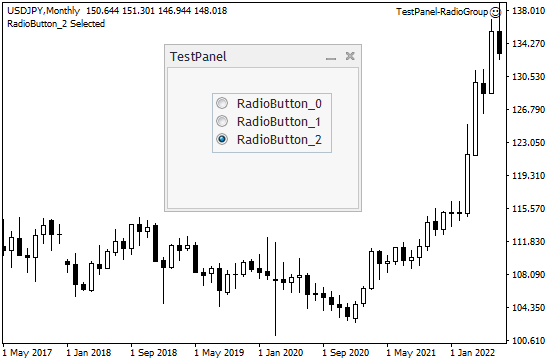
CRadioButton と CRadioGroup の違い
ラジオボタンは「複数の選択肢から1つだけ選ぶ」ための部品です。チェックボックスと違い、1つを選ぶと他は自動で外れます。
| 項目 | CRadioButton | CRadioGroup |
| インクルード | Controls\RadioButton.mqh | Controls\RadioGroup.mqh |
| 選択状態の取得 | State() | Value() |
| 取得できる値 | 選択中は1、未選択は0 | AddItem() で決めた値(例:1・2・4) |
| クリックで解除 | できない | できない(別の項目を選ぶと切り替わる) |
| 向いている用途 | CRadioGroup の部品(単体で使うことはまれ) | 複数の選択肢から1つだけ選ばせる |
ポイント
- 単体の CRadioButton は、一度選ぶと再クリックしても未選択に戻りません
- 選択肢が2つ以上あるなら、最初から CRadioGroup を使うのがかんたんです
- 解除できない理由など細かい仕様は、記事後半の「補足」で説明しています
CRadioButton 変更を受け取る
まずは、ラジオボタンを1つだけ置いた基本のダイアログを作ります。大まかな流れは次の3ステップです。
- RadioButton.mqh のインクルード
- MQL4\Include\Controls\RadioButton.mqh ヘッダーファイルをインクルードします
- カスタムクラスを定義
- CAppDialog を継承したクラス(ここでは CTestPanel、名前は自由)を定義して、下地になるパネルを Create
- ラジオボタンを作る CreateRadioButton() を定義
- イベントハンドラーでCRadioButtonの変更を受け取り、State() の値を Comment() でチャートに表示
- オブジェクトの作成
- CTestPanel のオブジェクト(インスタンス)TPanel を作り、OnInit() で Create して Run()
|
1 2 3 4 5 6 7 8 9 10 11 12 13 14 15 16 17 18 19 20 21 22 23 24 25 26 27 28 29 30 31 32 33 34 35 36 37 38 39 40 41 42 43 44 45 46 47 48 49 50 51 52 53 54 55 56 57 58 59 60 61 62 63 64 65 66 67 68 69 70 |
#include <Controls\Dialog.mqh> #include <Controls\RadioButton.mqh> class CTestPanel : public CAppDialog{ private: CRadioButton tRadioButton; public: CTestPanel(void){}; ~CTestPanel(void){}; //--- create virtual bool Create(const long chart,const string name,const int subwin,const int x1,const int y1,const int x2,const int y2); virtual bool OnEvent(const int id,const long &lparam,const double &dparam,const string &sparam); protected: bool CreateRadioButton(void); void OnChangeRadioButton(void); }; // Event Handler EVENT_MAP_BEGIN(CTestPanel) ON_EVENT(ON_CHANGE, tRadioButton, OnChangeRadioButton) EVENT_MAP_END(CAppDialog) bool CTestPanel::Create(const long chart,const string name,const int subwin,const int x1,const int y1,const int x2,const int y2){ if(!CAppDialog::Create(chart, name, subwin, x1, y1, x2, y2)) return(false); if(!CreateRadioButton()) return(false); return(true); } bool CTestPanel::CreateRadioButton(void){ if(!tRadioButton.Create(m_chart_id, "RadioButton01", m_subwin, 45, 26, 145, 46)) return(false); if(!tRadioButton.Text("RadioButton")) return(false); if(!tRadioButton.State(false)) return(false); if(!Add(tRadioButton)) return(false); Comment("RadioButton = "+IntegerToString(tRadioButton.State())); return(true); } void CTestPanel::OnChangeRadioButton(void){ Comment("RadioButton = "+IntegerToString(tRadioButton.State())); Print("State="+IntegerToString(tRadioButton.State())); } CTestPanel TPanel; int OnInit(){ if(!TPanel.Create( ChartID(), "TestPanel", 0, 160, 40, 360, 210 )){ return(INIT_FAILED); } TPanel.Run(); return(INIT_SUCCEEDED); } void OnDeinit(const int reason){ TPanel.Destroy(reason); } void OnChartEvent(const int id, const long& lparam, const double& dparam, const string& sparam ){ TPanel.ChartEvent(id, lparam, dparam, sparam); } |
起動直後は「RadioButton = 0」、ラジオボタンをクリックすると「RadioButton = 1」と表示されます。
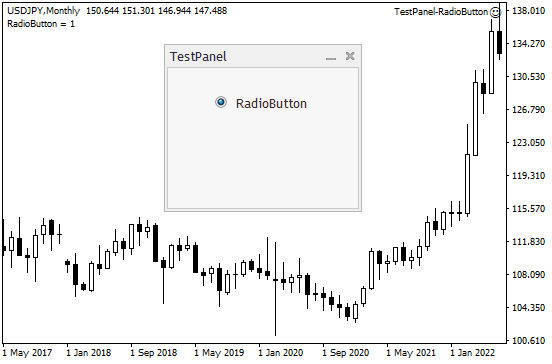
ただし、もう一度クリックしても 0 には戻りません。単体のラジオボタンは「選ぶ」ことはできても「外す」ことはできない仕組みです。
1つの項目を ON/OFF で切り替えたいだけなら、チェックボックス(CCheckBox)のほうが向いています。
CRadioGroup
CRadioGroup を使うと、複数の CRadioButton をまとめて1つのグループとして扱えます。RadioGroup.mqh の中で RadioButton.mqh がインクルードされているので、インクルードは RadioGroup.mqh だけで済みます。
どのボタンが選ばれたかは Value() で取得します。AddItem() で項目を追加するときに、ビット演算子の左シフト(1<<i)で 1・2・4 の値を割り当てておき、Value() の戻り値でどのボタンが選ばれたかを判定して Comment() に表示しています。
|
1 2 3 4 5 6 7 8 9 10 11 12 13 14 15 16 17 18 19 20 21 22 23 24 25 26 27 28 29 30 31 32 33 34 35 36 37 38 39 40 41 42 43 44 45 46 47 48 49 50 51 52 53 54 55 56 57 58 59 60 61 62 63 64 65 66 67 68 69 70 71 72 73 74 75 76 |
#include <Controls\Dialog.mqh> #include <Controls\RadioGroup.mqh> class CTestPanel : public CAppDialog{ private: CRadioGroup tRadioGroup; public: CTestPanel(void){}; ~CTestPanel(void){}; //--- create virtual bool Create(const long chart,const string name,const int subwin,const int x1,const int y1,const int x2,const int y2); virtual bool OnEvent(const int id,const long &lparam,const double &dparam,const string &sparam); protected: bool CreateRadioGroup(void); void OnChangeRadioGroup(void); }; // Event Handler EVENT_MAP_BEGIN(CTestPanel) ON_EVENT(ON_CHANGE, tRadioGroup, OnChangeRadioGroup) EVENT_MAP_END(CAppDialog) bool CTestPanel::Create(const long chart,const string name,const int subwin,const int x1,const int y1,const int x2,const int y2){ if(!CAppDialog::Create(chart, name, subwin, x1, y1, x2, y2)) return(false); if(!CreateRadioGroup()) return(false); return(true); } bool CTestPanel::CreateRadioGroup(void){ if(!tRadioGroup.Create(m_chart_id, m_name+"RadioButton", m_subwin, 45, 26, 165, 86)) return(false); if(!Add(tRadioGroup)) return(false); for(int i=0; i<3; i++){ if(!tRadioGroup.AddItem("RadioButton_"+IntegerToString(i), 1<<i)) return(false); } return(true); } void CTestPanel::OnChangeRadioGroup(void){ string comm; long val = tRadioGroup.Value(); if(val == 1) comm ="RadioButton_0 Selected"; else if(val == 2) comm ="RadioButton_1 Selected"; else if(val == 4) comm ="RadioButton_2 Selected"; Comment(comm); } CTestPanel TPanel; int OnInit(){ if(!TPanel.Create( ChartID(), "TestPanel", 0, 160, 40, 360, 210 )){ return(INIT_FAILED); } TPanel.Run(); return(INIT_SUCCEEDED); } void OnDeinit(const int reason){ TPanel.Destroy(reason); } void OnChartEvent(const int id, const long& lparam, const double& dparam, const string& sparam ){ TPanel.ChartEvent(id, lparam, dparam, sparam); } |
下の画像では RadioButton_2 が選択されています。
最初から特定の項目を選んだ状態にしておきたいときは、AddItem() の後に tRadioGroup.Value(1); のように、選びたい項目の値を指定します(MQL5 公式リファレンスのサンプルも同じ方法です)。
補足:単体のラジオボタンが解除できない理由
CRadioButton の選択状態は State() で取得できます。RadioButton.mqh には次のように定義されていて、内部のボタン(m_button)が押されているかどうかをそのまま返しています。
|
1 2 3 |
//--- state bool State(void) const { return(m_button.Pressed()); } bool State(const bool flag) { return(m_button.Pressed(flag)); } |
一方、クリックされたときの処理(OnClickButton)は、ボタンが押されていなければオンにするだけで、オフに戻す処理がありません。ヘッダーファイルのコメントにも「ラジオボタンはクリックではオフにできない(オンにしかできない)」という趣旨の説明があります。
そのため MQL5 の公式リファレンスでも、CRadioButton は単体で使うものではなく、CRadioGroup の項目を作るための部品と説明されています。
また、CRadioGroup の Value() の戻り値は long 型です。int で受け取るとコンパイル時に警告が出ることがあるので、サンプルでは long で受け取っています。