MQL4 のパネルで指値などの文字を入力したいときは、CEdit(入力欄)を使います。
この記事では、CEdit に入力した文字をボタンで取得し、CLabel に表示するところまでを作ります。
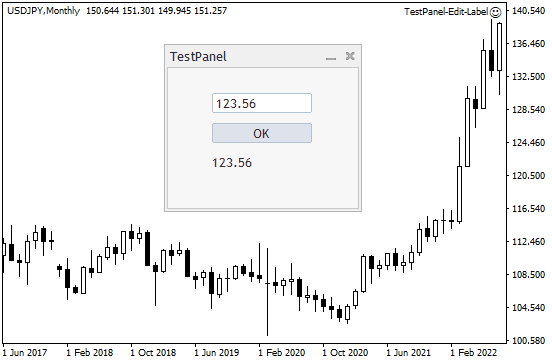
この記事で作るもの
- CEdit で文字の入力欄を作る
- OK ボタンで入力された文字を取得する
- 取得した文字を CLabel に表示する
CAppDialog に CLabel と CButton を配置する方法は、以下の記事で解説しています。今回はそのパネルに CEdit を追加します。

CEdit で文字入力欄を作る
まずは入力欄と OK ボタンだけの、基本的なダイアログを作ります。大まかな流れは次の3ステップです。
- ヘッダーファイルをインクルード
- ..\MQL4\Include\Controls\Edit.mqh をインクルードする
- 入力を確定するボタン用に Button.mqh もインクルードする
- カスタムクラスを定義
- CAppDialog を継承した CTestPanel クラスを定義し、Create() を書く
- 入力欄を作る CreateEdit() と、ボタンを作る CreateButton() を定義する
- イベントハンドラーで、ボタンをクリックしたら入力文字を Print() する OnClickButton() を呼ぶ
- オブジェクトを作成
- CTestPanel のオブジェクト(インスタンス)TPanel を作る
- OnInit() で Create() し、Run() で実行する
|
1 2 3 4 5 6 7 8 9 10 11 12 13 14 15 16 17 18 19 20 21 22 23 24 25 26 27 28 29 30 31 32 33 34 35 36 37 38 39 40 41 42 43 44 45 46 47 48 49 50 51 52 53 54 55 56 57 58 59 60 61 62 63 64 65 66 67 68 69 70 71 72 73 74 75 76 77 78 79 80 81 |
#include <Controls\Dialog.mqh> #include <Controls\Edit.mqh> #include <Controls\Button.mqh> class CTestPanel : public CAppDialog{ private: CEdit testEdit; CButton okButton; public: CTestPanel(void){}; ~CTestPanel(void){}; //--- create virtual bool Create(const long chart,const string name,const int subwin,const int x1,const int y1,const int x2,const int y2); protected: bool CreateEdit(void); bool CreateButton(void); void OnClickButton(void); // Event Handler EVENT_MAP_BEGIN(CTestPanel) ON_EVENT(ON_CLICK, okButton, OnClickButton) EVENT_MAP_END(CAppDialog) }; bool CTestPanel::Create(const long chart,const string name,const int subwin,const int x1,const int y1,const int x2,const int y2){ if(!CAppDialog::Create(chart, name, subwin, x1, y1, x2, y2)) return(false); if(!CreateEdit()) return(false); if(!CreateButton()) return(false); return(true); } bool CTestPanel::CreateEdit(void){ if(!testEdit.Create(m_chart_id, "Edit01", m_subwin, 45, 26, 145, 46)) return(false); // allow editing if(!testEdit.ReadOnly(false)) return(false); if(!testEdit.Text("Enter text")) return(false); if(!Add(testEdit)) return(false); return(true); } bool CTestPanel::CreateButton(void){ if(!okButton.Create(m_chart_id, "Button01", m_subwin, 45, 56, 145, 76)) return(false); if(!okButton.Text("OK")) return(false); if(!Add(okButton)) return(false); return(true); } void CTestPanel::OnClickButton(){ string inputString = testEdit.Text(); Print("Input: ", inputString); } CTestPanel TPanel; int OnInit(){ if(!TPanel.Create( ChartID(), "TestPanel", 0, 160, 40, 360, 210 )){ return(INIT_FAILED); } TPanel.Run(); return(INIT_SUCCEEDED); } void OnDeinit(const int reason){ TPanel.Destroy(reason); } void OnChartEvent(const int id, const long& lparam, const double& dparam, const string& sparam ){ TPanel.ChartEvent(id, lparam, dparam, sparam); } |
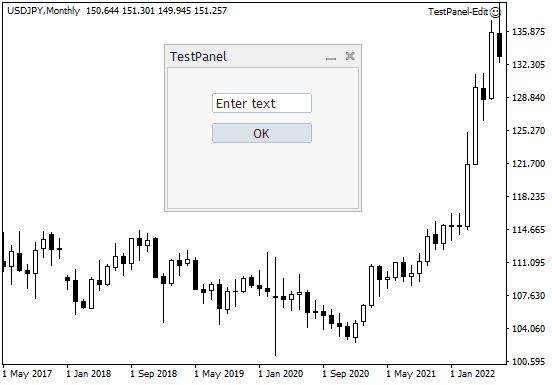
入力欄に文字を入れて OK を押すと、ターミナルの「エキスパート」タブに入力した文字列が出力されます。
入力した文字を CLabel に表示する
次に、CEdit に入力した文字を CLabel でパネル上に表示させます。
先ほどのコードに Label.mqh のインクルード、CLabel のメンバー変数、CreateLabel() を追加し、OnClickButton() の中でラベルに文字をセットしています。
|
1 2 3 4 5 6 7 8 9 10 11 12 13 14 15 16 17 18 19 20 21 22 23 24 25 26 27 28 29 30 31 32 33 34 35 36 37 38 39 40 41 42 43 44 45 46 47 48 49 50 51 52 53 54 55 56 57 58 59 60 61 62 63 64 65 66 67 68 69 70 71 72 73 74 75 76 77 78 79 80 81 82 83 84 85 86 87 88 89 90 91 92 93 94 95 |
#include <Controls\Dialog.mqh> #include <Controls\Edit.mqh> #include <Controls\Button.mqh> #include <Controls\Label.mqh> class CTestPanel : public CAppDialog{ private: CEdit testEdit; CButton okButton; CLabel testLabel; public: CTestPanel(void){}; ~CTestPanel(void){}; //--- create virtual bool Create(const long chart,const string name,const int subwin,const int x1,const int y1,const int x2,const int y2); protected: bool CreateEdit(void); bool CreateButton(void); void OnClickButton(void); bool CreateLabel(void); // Event Handler EVENT_MAP_BEGIN(CTestPanel) ON_EVENT(ON_CLICK, okButton, OnClickButton) EVENT_MAP_END(CAppDialog) }; bool CTestPanel::Create(const long chart,const string name,const int subwin,const int x1,const int y1,const int x2,const int y2){ if(!CAppDialog::Create(chart, name, subwin, x1, y1, x2, y2)) return(false); if(!CreateEdit()) return(false); if(!CreateButton()) return(false); if(!CreateLabel()) return(false); return(true); } bool CTestPanel::CreateEdit(void){ if(!testEdit.Create(m_chart_id, "Edit01", m_subwin, 45, 26, 145, 46)) return(false); // allow editing if(!testEdit.ReadOnly(false)) return(false); if(!testEdit.Text("Enter text")) return(false); if(!Add(testEdit)) return(false); return(true); } bool CTestPanel::CreateButton(void){ if(!okButton.Create(m_chart_id, "Button01", m_subwin, 45, 56, 145, 76)) return(false); if(!okButton.Text("OK")) return(false); if(!Add(okButton)) return(false); return(true); } bool CTestPanel::CreateLabel(void){ if(!testLabel.Create(m_chart_id, "Label", m_subwin, 45, 86, 145, 106)) return(false); if(!testLabel.Text("")) return(false); if(!Add(testLabel)) return(false); return(true); } void CTestPanel::OnClickButton(){ string inputString = testEdit.Text(); testLabel.Text(inputString); Print("Input: ", inputString); } CTestPanel TPanel; int OnInit(){ if(!TPanel.Create( ChartID(), "TestPanel", 0, 160, 40, 360, 210 )){ return(INIT_FAILED); } TPanel.Run(); return(INIT_SUCCEEDED); } void OnDeinit(const int reason){ TPanel.Destroy(reason); } void OnChartEvent(const int id, const long& lparam, const double& dparam, const string& sparam ){ TPanel.ChartEvent(id, lparam, dparam, sparam); } |
OK を押すと、入力した文字がラベルに表示されました。
CEdit を使うときのポイント
文字の取得と設定はどちらも Text()
CEdit の Text(“文字”) は入力欄に文字をセットし、引数なしの Text() は入力された文字を取得します。CLabel も同じ書き方です。
ReadOnly(false) で入力できるようにする
サンプルでは ReadOnly(false) で編集可能にしています。逆に ReadOnly(true) にすると入力できなくなるので、CEdit を CLabel のような表示専用の欄としても使えます。
指値として使うなら数値に変換する
Text() で取得できるのは文字列(string)です。指値など価格として注文に使う場合は、StringToDouble() で数値に変換してから使いましょう。
ボタンを使わずに入力確定で処理する方法
入力欄で Enter キーを押すなどして入力が確定すると、CEdit から ON_END_EDIT イベントが送られます。イベントマップに ON_EVENT(ON_END_EDIT, testEdit, 関数名) を追加すれば、OK ボタンなしで入力確定時に処理を実行できます。