MT4のチャートには注文・決済用のパネルが最初から付いていますが、MQL4を使えば自分でボタンを作ることもできます。
この記事では「ボタンを表示する → 見た目と位置を整える → クリックを受け取る」の3ステップで、EA(エキスパートアドバイザ)にボタンを付ける方法を解説します。
簡単なButtonを作成
まずは簡単なボタンを表示させて、クリックを受け取れるところまで作ってみます。
Buttonを表示
最初にボタンを1つ表示させてみましょう。
ボタンは ObjectCreate() で作り、オブジェクトの種類に OBJ_BUTTON を指定します。MetaEditorでEA(エキスパートアドバイザ)を新規作成し、以下のコードを書きます。
|
1 2 3 4 5 6 7 8 9 10 11 12 13 14 15 16 17 18 19 20 |
string button_01="Button_01"; int OnInit(){ // Button_01 create ObjectCreate( 0, // long chart_id button_01, // string object_name OBJ_BUTTON, // ENUM_OBJECT object_type 0, // int sub_window 0, // datetime time1 0 // double price1 ); return(INIT_SUCCEEDED); } void OnDeinit(const int reason){ ObjectDelete(0, button_01); } void OnTick(){ } |
OnDeinit() で ObjectDelete() を呼んでおくと、EAをチャートから外したときにボタンも一緒に消えます。
コンパイルしてチャートにセットすると、ボタンが表示されました。
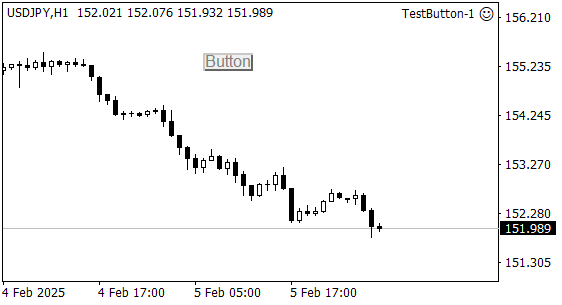
ボタンの位置はチャートの時間・価格ではなくピクセルで指定します。そのため、ObjectCreate() の時間(time1)と価格(price1)は0のままで大丈夫です。
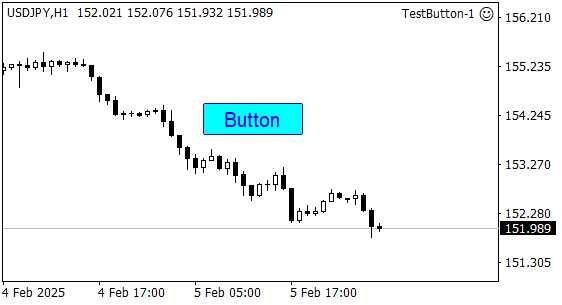
Buttonの名前、配色、位置
次に、ボタンに表示する文字や色、位置、大きさを設定します。
数値・色・true/falseは ObjectSetInteger()、文字列は ObjectSetString() で設定します。
|
1 2 3 4 5 6 7 8 9 10 11 12 13 14 15 16 17 18 19 20 21 22 23 24 25 26 27 28 29 30 31 32 33 34 35 |
// ... int OnInit(){ // Button_01 create ObjectCreate( 0, // long chart_id button_01, // string object_name OBJ_BUTTON, // ENUM_OBJECT object_type 0, // int sub_window 0, // datetime time1 0 // double price1 ); // Button Set up ObjectSetInteger(0, button_01, OBJPROP_COLOR, clrBlue); // Text color ObjectSetString(0, button_01, OBJPROP_TEXT, "Button"); // Text ObjectSetString(0, button_01, OBJPROP_FONT, "Arial"); // Font ObjectSetInteger(0, button_01, OBJPROP_FONTSIZE, 12); // Font Size ObjectSetInteger(0, button_01, OBJPROP_CORNER, CORNER_LEFT_UPPER); // Anchor corner ObjectSetInteger(0, button_01, OBJPROP_XDISTANCE, 200); // X position ObjectSetInteger(0, button_01, OBJPROP_YDISTANCE, 100); // Y position ObjectSetInteger(0, button_01, OBJPROP_XSIZE, 100); // button width ObjectSetInteger(0, button_01, OBJPROP_YSIZE, 32); // button height ObjectSetInteger(0, button_01, OBJPROP_BGCOLOR, clrAqua); // button color ObjectSetInteger(0, button_01, OBJPROP_BORDER_COLOR, clrBlue); // button border color ObjectSetInteger(0, button_01, OBJPROP_STATE, false); // pressed state (false = released) ObjectSetInteger(0, button_01, OBJPROP_BACK, false); // draw in background ObjectSetInteger(0, button_01, OBJPROP_SELECTABLE, false); // selectable by mouse ObjectSetInteger(0, button_01, OBJPROP_SELECTED, false); // selected state ObjectSetInteger(0, button_01, OBJPROP_HIDDEN, true); // hide in object list ObjectSetInteger(0, button_01, OBJPROP_ZORDER, 0); // click priority return(INIT_SUCCEEDED); } // ... |
ボタンの色や位置を細かく設定できました。
設定した項目の意味は以下のとおりです。
| プロパティ | 設定値 | 意味 |
OBJPROP_COLOR |
clrBlue |
文字の色 |
OBJPROP_TEXT |
"Button" |
ボタンに表示する文字 |
OBJPROP_FONT |
"Arial" |
フォント |
OBJPROP_FONTSIZE |
12 |
文字の大きさ |
OBJPROP_CORNER |
CORNER_LEFT_UPPER |
位置の基準にするチャートの角(左上) |
OBJPROP_XDISTANCE |
200 |
基準の角からの横の距離(ピクセル) |
OBJPROP_YDISTANCE |
100 |
基準の角からの縦の距離(ピクセル) |
OBJPROP_XSIZE |
100 |
ボタンの幅(ピクセル) |
OBJPROP_YSIZE |
32 |
ボタンの高さ(ピクセル) |
OBJPROP_BGCOLOR |
clrAqua |
ボタンの背景色 |
OBJPROP_BORDER_COLOR |
clrBlue |
ボタンの枠線の色 |
OBJPROP_STATE |
false |
押された状態か(false=押されていない) |
OBJPROP_BACK |
false |
チャートの背面に描くか(false=前面) |
OBJPROP_SELECTABLE |
false |
マウスで選択・移動できるようにするか |
OBJPROP_SELECTED |
false |
選択された状態にするか |
OBJPROP_HIDDEN |
true |
オブジェクトの一覧に名前を表示しない |
OBJPROP_ZORDER |
0 |
クリックを受け取る優先順位 |
Buttonクリック
続いて、ボタンがクリックされたときの処理(イベント処理)を作ります。
クリックは OnChartEvent() で受け取ります。EAとインジケーターで使える関数で、引数は次の4つです。
|
1 2 3 4 5 |
void OnChartEvent(const int id, // Event ID const long& lparam, // Parameter of type long event const double& dparam, // Parameter of type double event const string& sparam // Parameter of type string events ); |
ボタンなどのオブジェクトがクリックされると、id に CHARTEVENT_OBJECT_CLICK が、sparam にクリックされたオブジェクトの名前が入ります。
そこで、id が CHARTEVENT_OBJECT_CLICK かどうかを判定し、さらに sparam がボタンの名前と一致するかをif文で確認します。
|
1 2 3 4 5 6 7 8 9 10 11 12 13 14 |
// Get the object event void OnChartEvent(const int id, const long &lparam, const double &dparam, const string &sparam){ if(id == CHARTEVENT_OBJECT_CLICK){ // Button click if(sparam == button_01){ // Button Status bool btStatus = (bool)ObjectGetInteger(0, button_01, OBJPROP_STATE); Print("Button Pressed = ", btStatus); } } } |
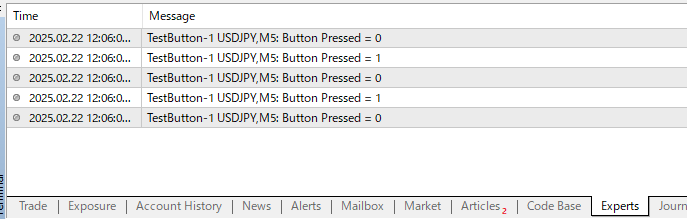
ボタンをクリックするたびに状態(true/false)が切り替わり、クリックを受け取れていることがログで確認できます。
まとめたコード
ここまでのコードをまとめると、以下のとおりです。
|
1 2 3 4 5 6 7 8 9 10 11 12 13 14 15 16 17 18 19 20 21 22 23 24 25 26 27 28 29 30 31 32 33 34 35 36 37 38 39 40 41 42 43 44 45 46 47 48 49 50 51 52 53 54 55 56 57 |
string button_01="Button_01"; int OnInit(){ // Button_01 create ObjectCreate( 0, // long chart_id button_01, // string object_name OBJ_BUTTON, // ENUM_OBJECT object_type 0, // int sub_window 0, // datetime time1 0 // double price1 ); // Button Set up ObjectSetInteger(0, button_01, OBJPROP_COLOR, clrBlue); // Text color ObjectSetString(0, button_01, OBJPROP_TEXT, "Button"); // Text ObjectSetString(0, button_01, OBJPROP_FONT, "Arial"); // Font ObjectSetInteger(0, button_01, OBJPROP_FONTSIZE, 12); // Font Size ObjectSetInteger(0, button_01, OBJPROP_CORNER, CORNER_LEFT_UPPER); // Anchor corner ObjectSetInteger(0, button_01, OBJPROP_XDISTANCE, 200); // X position ObjectSetInteger(0, button_01, OBJPROP_YDISTANCE, 100); // Y position ObjectSetInteger(0, button_01, OBJPROP_XSIZE, 100); // button width ObjectSetInteger(0, button_01, OBJPROP_YSIZE, 32); // button height ObjectSetInteger(0, button_01, OBJPROP_BGCOLOR, clrAqua); // button color ObjectSetInteger(0, button_01, OBJPROP_BORDER_COLOR, clrBlue); // button border color ObjectSetInteger(0, button_01, OBJPROP_STATE, false); // pressed state (false = released) ObjectSetInteger(0, button_01, OBJPROP_BACK, false); // draw in background ObjectSetInteger(0, button_01, OBJPROP_SELECTABLE, false); // selectable by mouse ObjectSetInteger(0, button_01, OBJPROP_SELECTED, false); // selected state ObjectSetInteger(0, button_01, OBJPROP_HIDDEN, true); // hide in object list ObjectSetInteger(0, button_01, OBJPROP_ZORDER, 0); // click priority return(INIT_SUCCEEDED); } void OnDeinit(const int reason){ ObjectDelete(0, button_01); } void OnTick(){ } // Get the object event void OnChartEvent(const int id, const long &lparam, const double &dparam, const string &sparam){ if(id == CHARTEVENT_OBJECT_CLICK){ // Button click if(sparam == button_01){ // Button Status bool btStatus = (bool)ObjectGetInteger(0, button_01, OBJPROP_STATE); Print("Button Pressed = ", btStatus); } } } |
補足:知っておきたいポイント
細かい注意点をまとめておきます。
- ボタンは押すたびに状態が切り替わります。
OBJPROP_STATEがtrue(押された)とfalse(戻った)で交互に変わるため、1回目のクリックでへこみ、2回目で元に戻ります。 - 押したらすぐ元に戻るボタンにしたい場合は、クリック時の処理の最後で状態をfalseに戻し、
ChartRedraw()で再描画します(下のコード)。 ObjectGetInteger()の戻り値はlong型です。 bool型の変数で受け取るため、(bool)を付けて型を明示しています。OBJPROP_HIDDENをtrueにしても、ボタンは消えません。 オブジェクトの一覧に名前が出なくなるだけです。
|
1 2 3 4 5 6 |
if(sparam == button_01){ Print("Button Pressed"); // release the button ObjectSetInteger(0, button_01, OBJPROP_STATE, false); ChartRedraw(); } |
References:
MQL4 ObjectCreate
MQL4 OBJ_BUTTON
MQL4 ObjectSetInteger
MQL4 ObjectGetInteger
MQL4 Object Properties
MQL4 OnChartEvent(Event Handling Functions)
MQL4 Types of Chart Events