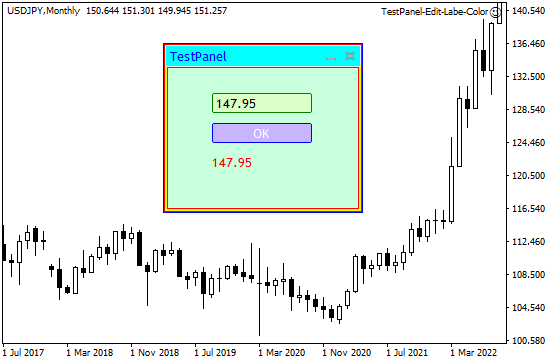
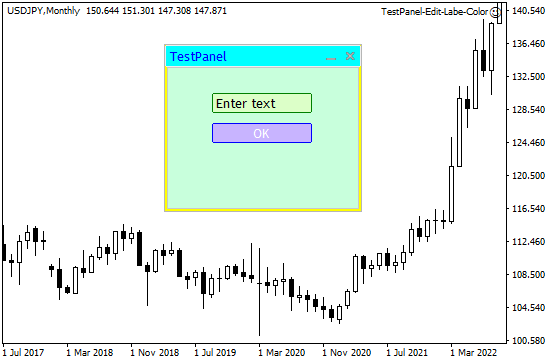
CAppDialog(パネル本体)と、パネルに載せたボタンなどの部品に色を付ける方法を紹介します。
- 部品の色は ColorBackground()(背景)、Color()(文字)、ColorBorder()(枠線)で変えます
- パネル本体は、中にある部品(Client・Back・Caption・Border)を名前で探して色を付けます
色の指定方法
色は color 型の変数で指定します。書き方は次の3通りです。
|
1 2 3 4 5 6 7 8 9 10 11 12 13 14 |
color clr; // RGBをC''に10進数、16進数で色を指定 clr = C'125, 125, 125'; // Gray clr = C'0x00, 0x00, 0xFF'; // Blue // 定義されたWebカラー名を指定 clr = clrRed; // Red clr = clrYellow; // Yellow // そのまま10進数、16進数で色を指定 clr = 0xFFFFFF; // White clr = 16777215; // White clr = 0x008000; // Green clr = 32768; // Green |
| 書き方 | 例 | ポイント |
C'赤,緑,青' |
C'125,125,125' |
一番わかりやすい。0〜255で指定 |
| 色の名前 | clrRed |
あらかじめ用意された色名を使う |
| 16進数・10進数 | 0x008000 |
青・緑・赤の順なので注意 |
16進数は 0x00BBGGRR(青・緑・赤)の並びです。たとえば 0x0000FF は「赤」になり、HTMLの色コードとは逆になります。迷ったら C'赤,緑,青' か色の名前を使うのが確実です。
CAppDialog 本体の色設定
CAppDialog は見た目は1枚のパネルですが、中は複数の部品が重なってできています。どの部品がどこに当たるかを先に整理しておきます。
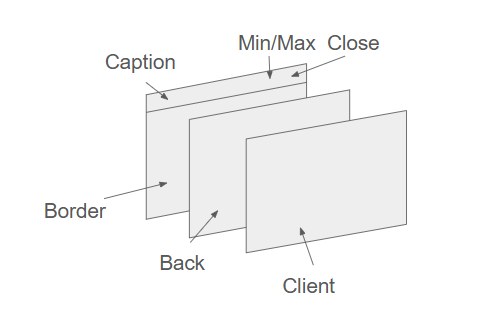
| 部品名 | 型 | 色が変わる場所 |
| Client | CWndClient | パネルの中央(ボタンなどを載せる面) |
| Back | CPanel | Client の周り。タイトル右の最小化・閉じるボタンの背景もここ |
| Caption | CEdit | タイトル部分(独立している) |
| Border | CPanel | 一番外側。Back に覆われるのでほとんど見えない |
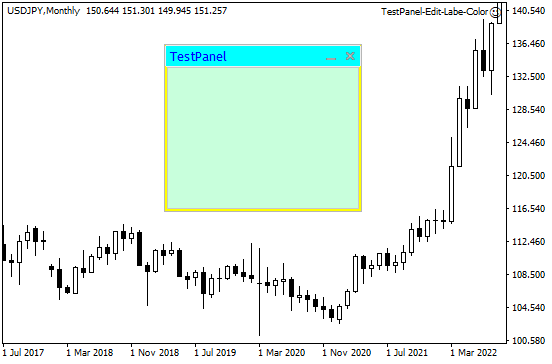
色を付けるメソッド setDialogColor() を作ります。ControlsTotal() と Control(i) で部品を順番に取り出し、名前(パネル名+"Back" など)で判定して ColorBackground() で色を付けます。
|
1 2 3 4 5 6 7 8 9 10 11 12 13 14 15 16 17 18 19 20 21 22 23 24 25 26 27 28 29 30 31 32 33 34 35 36 37 38 39 40 41 42 43 44 45 46 47 48 49 50 51 52 53 54 55 56 57 58 59 60 61 62 |
class CTestPanel : public CAppDialog{ private: CEdit testEdit; CButton okButton; CLabel testLabel; public: CTestPanel(void){}; ~CTestPanel(void){}; //--- create virtual bool Create(const long chart,const string name,const int subwin,const int x1,const int y1,const int x2,const int y2); void setDialogColor(void); ... } ... void CTestPanel::setDialogColor(void){ string prefix=Name(); int total=ControlsTotal(); for(int i=0;i<total;i++){ CWnd*obj=Control(i); string name=obj.Name(); if(name==prefix+"Border"){ CPanel *panel=(CPanel*) obj; panel.ColorBackground(clrAqua); // panel.ColorBorder(clrBlue); ChartRedraw(); } if(name==prefix+"Caption"){ CEdit *edit=(CEdit*) obj; edit.ColorBackground(clrAqua); edit.Color(clrBlue); ChartRedraw(); } if(name==prefix+"Back"){ CPanel *panelB=(CPanel*) obj; panelB.ColorBackground(clrYellow); // panelB.ColorBorder(clrRed); ChartRedraw(); } if(name==prefix+"Client"){ CWndClient *wndclient=(CWndClient*) obj; wndclient.ColorBackground(C'200,255,220'); // wndclient.ColorBorder(clrRed); ChartRedraw(); } } } ... int OnInit(){ if(!TPanel.Create( ChartID(), "TestPanel", 0, 160, 40, 360, 210 )){ return(INIT_FAILED); } TPanel.setDialogColor(); ... } |
最小化・閉じるボタンの背景は Back と同じ色(ここでは黄色)になります。Caption など、ほかの部品と色を合わせると見た目がまとまります。
CEdit, CButton, CLabel の色設定
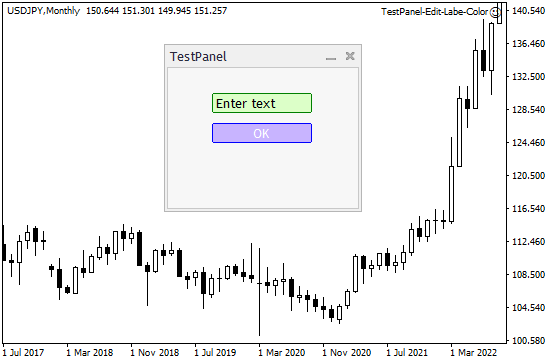
CEdit や CButton などの部品は、それぞれの Create 処理の中で色を指定できます。
| メソッド | 変わる場所 |
| Color() | 文字の色 |
| ColorBackground() | 背景の色 |
| ColorBorder() | 枠線の色 |
|
1 2 3 4 5 6 7 8 9 10 11 12 13 14 15 16 17 18 19 20 21 22 23 24 25 26 27 28 29 30 31 32 33 34 35 36 |
// CEdit bool CTestPanel::CreateEdit(void){ if(!testEdit.Create(m_chart_id, "Edit01", m_subwin, 45, 26, 145, 46)) return(false); // allow editing if(!testEdit.ReadOnly(false)) return(false); if(!testEdit.Text("Enter text")) return(false); if(!testEdit.Color(C'0,0,0')) return(false); if(!testEdit.ColorBackground(C'220,255,200')) return(false); if(!testEdit.ColorBorder(clrGreen)) return(false); if(!Add(testEdit)) return(false); return(true); } // CButton bool CTestPanel::CreateButton(void){ if(!okButton.Create(m_chart_id, "Button01", m_subwin, 45, 56, 145, 76)) return(false); if(!okButton.Text("OK")) return(false); if(!okButton.Color(C'255,255,255')) return(false); if(!okButton.ColorBackground(C'200,180,255')) return(false); if(!okButton.ColorBorder(C'0,0,255')) return(false); if(!Add(okButton)) return(false); return(true); } // CLabel bool CTestPanel::CreateLabel(void){ if(!testLabel.Create(m_chart_id, "Label", m_subwin, 45, 86, 145, 106)) return(false); if(!testLabel.Text("")) return(false); if(!testLabel.Color(clrRed)) return(false); if(!Add(testLabel)) return(false); return(true); } |
ColorBorder() で枠線に色を付けると、部品の境目がわかりやすくなります。
サンプルコード
ここまでの内容をまとめたコードです。
|
1 2 3 4 5 6 7 8 9 10 11 12 13 14 15 16 17 18 19 20 21 22 23 24 25 26 27 28 29 30 31 32 33 34 35 36 37 38 39 40 41 42 43 44 45 46 47 48 49 50 51 52 53 54 55 56 57 58 59 60 61 62 63 64 65 66 67 68 69 70 71 72 73 74 75 76 77 78 79 80 81 82 83 84 85 86 87 88 89 90 91 92 93 94 95 96 97 98 99 100 101 102 103 104 105 106 107 108 109 110 111 112 113 114 115 116 117 118 119 120 121 122 123 124 125 126 127 128 129 130 131 132 133 134 135 136 137 138 139 140 141 142 143 |
#include <Controls\Dialog.mqh> #include <Controls\Edit.mqh> #include <Controls\Button.mqh> #include <Controls\Label.mqh> class CTestPanel : public CAppDialog{ private: CEdit testEdit; CButton okButton; CLabel testLabel; public: CTestPanel(void){}; ~CTestPanel(void){}; //--- create virtual bool Create(const long chart,const string name,const int subwin,const int x1,const int y1,const int x2,const int y2); void setDialogColor(void); protected: bool CreateEdit(void); bool CreateButton(void); void OnClickButton(void); bool CreateLabel(void); // Event Handler EVENT_MAP_BEGIN(CTestPanel) ON_EVENT(ON_CLICK, okButton, OnClickButton) EVENT_MAP_END(CAppDialog) }; bool CTestPanel::Create(const long chart,const string name,const int subwin,const int x1,const int y1,const int x2,const int y2){ if(!CAppDialog::Create(chart, name, subwin, x1, y1, x2, y2)) return(false); if(!CreateEdit()) return(false); if(!CreateButton()) return(false); if(!CreateLabel()) return(false); return(true); } bool CTestPanel::CreateEdit(void){ if(!testEdit.Create(m_chart_id, "Edit01", m_subwin, 45, 26, 145, 46)) return(false); // allow editing if(!testEdit.ReadOnly(false)) return(false); if(!testEdit.Text("Enter text")) return(false); if(!testEdit.Color(C'0,0,0')) return(false); if(!testEdit.ColorBackground(C'220,255,200')) return(false); if(!testEdit.ColorBorder(clrGreen)) return(false); if(!Add(testEdit)) return(false); return(true); } bool CTestPanel::CreateButton(void){ if(!okButton.Create(m_chart_id, "Button01", m_subwin, 45, 56, 145, 76)) return(false); if(!okButton.Text("OK")) return(false); if(!okButton.Color(C'255,255,255')) return(false); if(!okButton.ColorBackground(C'200,180,255')) return(false); if(!okButton.ColorBorder(C'0,0,255')) return(false); if(!Add(okButton)) return(false); return(true); } bool CTestPanel::CreateLabel(void){ if(!testLabel.Create(m_chart_id, "Label", m_subwin, 45, 86, 145, 106)) return(false); if(!testLabel.Text("")) return(false); if(!testLabel.Color(clrRed)) return(false); if(!Add(testLabel)) return(false); return(true); } void CTestPanel::OnClickButton(){ string inputString = testEdit.Text(); testLabel.Text(inputString); Print("Input: ", inputString); } void CTestPanel::setDialogColor(void){ string prefix=Name(); int total=ControlsTotal(); for(int i=0;i<total;i++){ CWnd*obj=Control(i); string name=obj.Name(); if(name==prefix+"Caption"){ CEdit *edit=(CEdit*) obj; edit.ColorBackground(clrAqua); edit.Color(clrBlue); ChartRedraw(); } if(name==prefix+"Border"){ CPanel *panel=(CPanel*) obj; panel.ColorBackground(clrAqua); //panel.ColorBorder(clrBlue); ChartRedraw(); } if(name==prefix+"Back"){ CPanel *panelB=(CPanel*) obj; panelB.ColorBackground(clrYellow); //panelB.ColorBorder(clrRed); ChartRedraw(); } if(name==prefix+"Client"){ CWndClient *wndclient=(CWndClient*) obj; wndclient.ColorBackground(C'200,255,220'); //wndclient.ColorBorder(clrRed); ChartRedraw(); } } } CTestPanel TPanel; int OnInit(){ if(!TPanel.Create( ChartID(), "TestPanel", 0, 160, 40, 360, 210 )){ return(INIT_FAILED); } TPanel.setDialogColor(); TPanel.Run(); return(INIT_SUCCEEDED); } void OnDeinit(const int reason){ TPanel.Destroy(reason); } void OnChartEvent(const int id, const long& lparam, const double& dparam, const string& sparam ){ TPanel.ChartEvent(id, lparam, dparam, sparam); } |
実行すると、パネルと各部品に色が付きます。
サンプル内でコメントアウトしている ColorBorder() を有効にすると、パネルの各部品に枠線の色も付けられます。